Sunday, August 3, 2008

As pimped as it will get

Well, it's done! Or at least as done as it will get. It's certainly not perfect, but it will work, and it fits me. So, without further ado, the view from the door: My new cutting table, and sewing station, and a view of the lights:


The view from the bathroom: Cutting table and gradma's sewing machine.

The view from the grandma's machine, the bathroom and a bookcase:

The view from the sewing station: The pressing table and a big closet.
Okay, so I'm not totally done pimping. I do want to finish quilting this top and put it over the pressing table.
Old room and layouts are here.

Not square, but done

So, tis finished!

The cubbies are really, really bad, but they work.

And the pièce de résistance: a really large paper towel holder:
It's actually a gift wrap dispenser. It holds my tracing paper (soil separator cloth) really well, and I bet it would also work for other standard tracing papers.

The only problem is I bought it after I had started building the cabinet. So its not centered at all. But, I don't really mind.

I've got so much storage in this. Oh, and that far left middle drawer that I simple couldn't get to work? DH asked which drawer was the problem. Right as I was about to scream "don't touch it, that's the one that's broken," he opened it like a dream. Sigh. I don't know what my problem was. But it's working perfectly now!

Monday, July 21, 2008

Progress. Slow, but progress

So, I have actually been working on this cutting table. The weekend of my last post, I had a flurry of activity and even got all the drawers done. The next weekend was tied up doing life stuff, but this weekend I did get the whole bugger-boo upstairs.


Yes, it does look like I was drunk when I put the right side together. No, I wasn't. Unfortunately, I can't really fix any of it now. The right most cabinet is too small to get my drill in, so I can't replace those drawer slides. And I have no idea what happened to the cubby holes, but they are all messed up. They are functional, though. So I'm sticking with them.

I had another drawer that simply did not want to function (far left, middle drawer). It was working find downstairs, but refuses to slide up here. So, I just gave up and used the mallet to knock it in.

Speaking of mallets, I have finally gotten my finders smashed. Was it while working with a finicky drawer? No. At least trying to get the massive cabinet together? No. It was inserting snaps...

Sigh. I did actually get some sewing done. My gym bag is starting to get funky. I hate fragrance, though. So I read about Zeolite as a natural deodorizer.

And if it comes in a bag with a cool hamster, all the better, right? So, I made some muslin bags. I wanted to be able to remove the rocks and 1) wash the bags and 2) "sun" the zeolite which supposedly clears out the smells once it starts working.


Anyway, there I am installing the snaps and bang! Felt like an idiot. But, it was still better than paying 25 bucks for something similar.

Anyway, still have to get the doors installed, then take everything off and paint it. Then I will be done!!

Wednesday, July 2, 2008

Cutting Table is coming along!

Last weekend I was able to do a little bit for my cutting table, though not as much as I had hoped. Since many of us in the US get this Friday off, I'm hoping I'll be able to see significant progress this weekend.

Here's where I am right now:
Bay 1 and 2 will hold two wide stacks of drawers, and then a thin shelf area (complete with another landing zone!) The bit on the far right on top of the toolbox is the beginning of my custom mod for this. It will be four simple cubbies to hold my fabulous Greenberg & Hammer transfer paper. These are huge sheets that I don't want to fold. Right now I just lay them in my closet, but that's not very safe.

The inside is made from two thin sheets of plywood cut halfway down the middle and then pieced together.

I remember playing with toys like this when I was a kid, but I can't remember what they are called. Luckily, the idea stuck with me.

Right now, the paper holder is disassembled and being painted before I glue it up. (I really want the paper to have a nice slick surface to slide on, so the high gloss paint, and a bunch of sanding, should help).

This weekend I'm off to the hardware store to look for the final piece for my paper mod. And I hope I'll get the drawers cut out. I may even start routing all those edges, but I really don't love that part.

Sunday, June 15, 2008

BWOF 5-05 #133 Facings

For those family and friends who read this blog just to see what I'm up to, feel free to stop now. I'm going to try to demonstrate a sewing technique.

***********
Drafting the facing:

After altering a pattern's body pieces it can be a real pain to then have to remember all the alterations you did to change the facing. So here is my quick and dirty trick.

Note: I only do this when I have enough fabric to cut out another facing if this doesn't work :)


Note 2: If you click on the picture, blogger will open it up a little bigger.

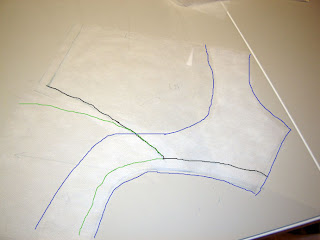
These are the back pieces for the dress. The black lines are the important seam lines for the center back piece, the green lines are the important seam lines for the site back piece. I lay the pieces down so that the princess seam lines at the armscye are touching. This means that they pieces overlap by 1 and 1/4" because you must take the seam allowances out of the equation.

Don't worry about the big old gap caused at the bottom, we don't care for the facings. Instead, just lay another piece of tracing paper and trace around the edges and then cut roughly around the blue line. Voila! A back facing that takes into account any busy/shoulder/width adjustments you made.

***************
Sewing the shoulders.

Burda's directions are plenty accurate, but they aren't intuitive, so I'm trying to share some pics.

I think the directions are clear about putting the facing on, and sewing up to about 1.5" away from the cut edge. Then it all goes crazy.

The first important thing is to turn facings to the inside at this point (ask me how I know). Then sew the shoulder seams for the body. It's important to fold the facing bits down. I pinned them to keep them out of the way, as below. It's also important to sew the right front shoulder to the right back shoulder. Your dress will look very odd if you try to sew the right front shoulder to the left front shoulder (ask me how I know).

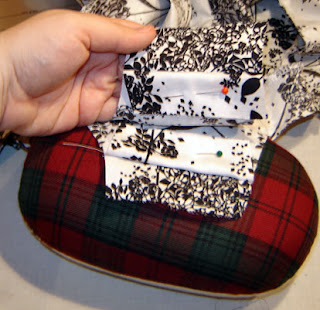
Then, with some finagling, sew the shoulder seams of the facings. This will take some work, but you should end up with something that looks like this:
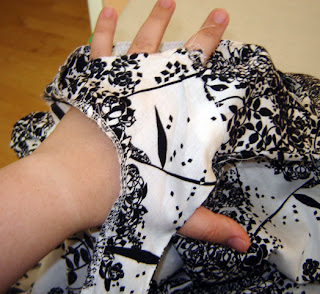
This is me coming from under the facing and poking my hand out where there are still holes.

I tried to take pictures of the next bit, but the fabric is very busy and it just looks like a wad. So, first thing to remember is that it's o'kay if it looks like a wad.

To get an idea for what you do:
Sew one side of the straps at a time.
In the picture above, as I am pulling by thumb out of the gap, I would pinch the facing and body pieces at that opening and pull them with me. Then sew the gap opening closed. Here is what it looks like after you've pulled the gap. The red line is the approximate sewing line.

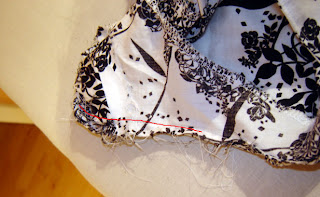
After you sew that line, sew the other side of the strap by following the same procedure.

It's hard to visualize, but easy once you do it. The nice thing is that there is no need for hand sewing!

Pressing Table in Action!

I actually sewed some this week. It was the first time I needed to use the entire top of my pressing table since its completion.

It works so fabulously! The top is much firmer than the ironing cover for the hobby table. There was one small glitch:

If you look closely, the landing zone forces the fabric to bunch a little. However, I don't know how one would get around this since I want to be able to have fabric running off on all sides. It's still much nicer than having to find another place to put the iron.

Today I got some of my big cuts done for the cutting table. Don't know how much I'll be able to get done the rest of this month since we're having visitors next weekend, but it's a start.

Sunday, June 8, 2008

Planning the last part

This weekend the only productive bit I did was to mess up my sewing room :) I drug out all the materials I want close at hand while cutting/tracing/altering patterns.

Here's what I have and how I'm thinking of storing them:

Left to right:
  • Rulers/french curves: I think I'll build a divider like the following into one of the drawers. That will mean that I will need to make the drawer a little taller than my cone thread drawers in the pressing cabinet, but that's okay

  • Cutting implements/ Pattern Weights/ Tracing utensils: Just a shallow drawer for this. Don't need anything fancy:
  • The really long things are my lovely tracing papers that I got from Greenberg and Hammer Plus there is my tracing paper. Like many folks on PR, I use Soil Separator cloth
    to trace my patterns. This pieces are really long, so I'll have to make full width cubby holes. I have a special idea for the cloth, but I don't want to spoil it if it doesn't work.