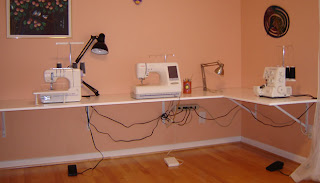
I'm so excited that at least one part of my sewing room project is done. Ta Da!
My wall isn't square so there's little bit of a gap behind the table at places, but I'm okay with that. I've mounted the surge protector onto the wall, so at least nothing but foot pedals are on the floor. The mounts of wires are beautiful, but I guess I can't be too picky.
I did something I saw in a workbench book: I drilled little holes in the back for my lamps. That way I have one less thing to take up counter space.
The most important thing is that it fits! I can swoop my chair to any of the machines and they all feel like they are the right height!
Now that I've done the absolutely easiest thing in this room I'm going to try building drawers. If I can get them square I will be so happy.
Sunday, February 24, 2008
Monday, February 18, 2008
Actual Progress!
Yep, I've done something. Quite a few somethings, actually.
I've ordered the techlighting, which should get here in about a month.
I sold my old computer desk Craigslist, and the lady picked it up on Sat. 15 minutes later I was marking a level line to make my sewing desk. DH came in asking what I was doing.
"Installing the brackets to hold up my desk."
"But you haven't built anything yet."
"Yeah, but I like ratchets."
I decided to buy heavy duty brackets so I wouldn't have to figure out the right size for my table. I used two for the short part of the L and 3 for the long part because plywood tends to warp over 36".
They feel very heavy because they are installed into the studs. I found a good trick for finding studs: Measure 16" from one side of an electrical box. Most are secured against a stud. Worked well for me.
I suppose I should talk about my choice of countertops. I decided that the laminate countertop was too expensive. I found some good pieces of countertop at my local Habitat for Humanity ReUse center, but they weren't the right size. So, I almost went with melamine, but then I looked at my bookshelves and remembered why I hate that so much. So, I decided to go the plywood and paint route. At least this way I can sand and repaint it easily if it gets scratched up.
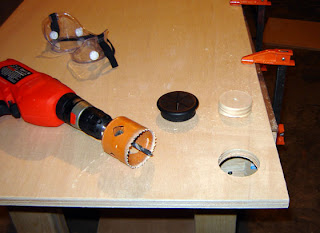
Plus, with plywood I can "easily" cut holes for grommets. Ta Da!
I say "easily" because it does seem really easy, but you need to be patient. Buy a special drill bit that allows you to attach whatever size hole saw you need. Point and drill. What I didn't realize I would have to stop so often and clean out the cut, and clean off the gunk sticking to the saw. Once I realized that, no problems. The grommets I got from Rockler. The recommended hole size is a perfect fit.
So, that's what I got this weekend. Tonight I primed the back of the wood. It will be boring for a while, but I hope I will have the sewing desk done this weekend... then the hard stuff!
Monday, February 11, 2008
What's going on
I know I haven’t posted much, but I am still working on this… there’s just not much to show for it yet…
Here’s a big pile of plywood. Now I have to do a lot of cutting!
If nothing else, this has made me committed to do this thing... I've spent too much in wood to not. My next goal is to get rid of my current computer (sewing) desk so I can build my sewing table. That should be easy since I'm not building any storage into it.
I am also thinking about my lighting plan. At first I wasn’t going to change anything, just leave the one big fluorescent in the middle of the room. BUT, while I was playing around one day I realized how much shadow I would create while cutting or pressing.
I can do the “easy” thing and have an electrician install two can lights over each table, but my parent’s in law have this cool monorail lighting system that looks like it could be perfect. They went with Techlighting http://techlighting.com/default.asp?page=products&subpage=systemselect&sysid=1
Who wouldn't love a 5" bee light in her sewing room?
Okay, okay, I know a lot of people wouldn't, but I do!!
So, I’m trying to figure out how much light I need. Black says 2500 lumens. I want to use LED lights (yes, I know they’re really expensive, but they are much cooler and better for the environment). This would mean 13 bulbs, assuming a lumen rating of 200/bulb. I’m going to see if I can find a distributor and go see what they think!
Subscribe to:
Posts (Atom)