Sunday, March 30, 2008

Hurrah for Pop!

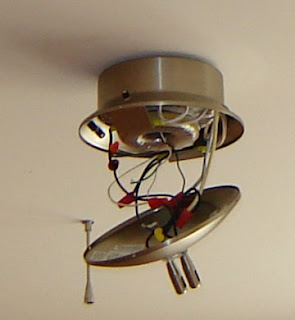
If you have any say in the matter, I highly recommend having an electrical engineer as a father. While he couldn't diagnose my problem over the phone, with multimeter in hand he was able to find the problem and fix it in less than one hour tonight. He found that I had rather exuberantly screwed two screws in so far that they pierced the insulation on a wire and caused a short.

But that is all fixed now and ta da...

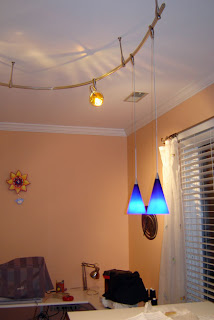
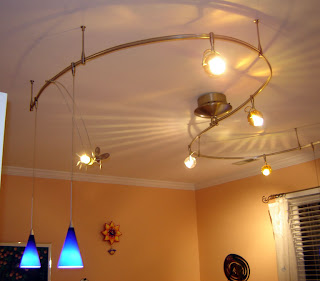
We've got a spiral going on.

The cone lights work very well for the table, and the opaqueness doesn't blind me!

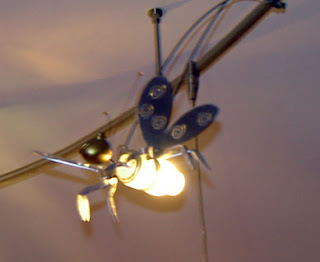
And of course, the bug


DH was rather in awe at the completed project, but it's perfect. Plenty of light and so not typical. This room is going to be quite interesting!

Other than finishing this up tonight, I've done nothing this weekend... at all. I was feeling guilty, but s DH reminded me, there is no time limit on completing this, and I don't have to work every weekend.

Of course, now I'm so psyched about the room and that I really want to work some more!

Sunday, March 23, 2008

Carpenter? Maybe. Electrician? No

I was so excited that my lights arrived on Wednesday. I took Friday off, and started to unpack them because I wanted to see how to layout the rail... that was my first problem. I had no rail. I had two 8 foot pieces of "power extenders" but I had to spend three phone calls to my rep explaining the problem. She was able to find me two pieces that day, though. So huzzah!

Layout the rail was okay. The monorail is "hand bendable," which is true, but it also requires a good bit of force.

After looking at the instructions to install the transformer, I figured I could do it. It seemed like the other light replacements I had done: take off the old one, black wire to black wire, white to white, and ground to ground...

Here's where I stand now:


After we got the transformer hooked up, and the monorail up, with supports, and one light on it (each piece contains its own separate instruction sheet and hex wrench!), I flicked the breaker and lightswitch: pop! The breaker on the transformer blew.

Turns out it blows even without any fixture, or the monorail... so we're back at square one. My dad, an electrical engineer, said he could come out to help me next weekend. So now, I'm sans light, but I do think they will be gorgeous (well, at least colorful) when they're up!

Sunday, March 16, 2008

drawers, schmawers

We're still waiting for the fantabulous lights to get here, so I haven't been building anything big yet. I'm sure the electrician is going to need all the floor space, and the pressing table will have to be built in the room b/c it will be so big.

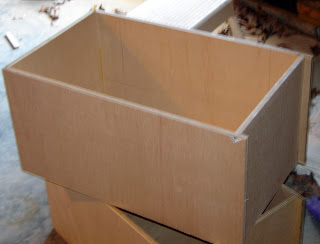
But, I have been working on some drawer boxes. Here's my schematic:
The front is to the left (there will be a face plate on it to cover the joints.
Anywho, since I don't have the skills or set-up to do real dovetails, this is about the strongest joint I can make. The sides have two dadoes in them and the front has a small rabbet to lock into the dado. All were made by the router. I also routed a small groove around all four sides to hold the drawer base.

It's been a week since I've started and I've only got three drawers made. Here's two:


Right now I'm wondering why on earth I decided to make drawer... but then I remind myself 1) I like using drawers more than cupboards or open shelves, 2) I can make them the size I want,
and 3) it's good for me, right?

These drawers are the right size for my patterns, which I store in manila envelopes. I made them a little bigger than standard file drawers b/c I'm always feeling like I'm squishing the envelopes.

I've also got some sewing done. The curtains in the sewing room are finally hemmed to the correct length (finally, almost 2 years after we moved in!).

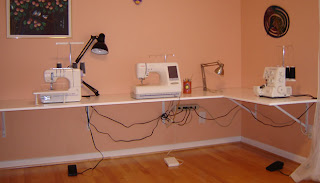
I have to say I love having all my machines on one run of counter. I just roll where I need to go. The serger was a little bouncy, though. I think I installed the bracket on the edge of the stud not the middle of it. So I've installed another one in the middle and it seems to help. However, if you do a lot of embroidery, you may want to put legs on your table. I still may end up putting a leg at the front, but I'd rather not have to.

Other than that, everything is working as planned!

Sunday, February 24, 2008

My babies have a home!

I'm so excited that at least one part of my sewing room project is done. Ta Da!


My wall isn't square so there's little bit of a gap behind the table at places, but I'm okay with that. I've mounted the surge protector onto the wall, so at least nothing but foot pedals are on the floor. The mounts of wires are beautiful, but I guess I can't be too picky.

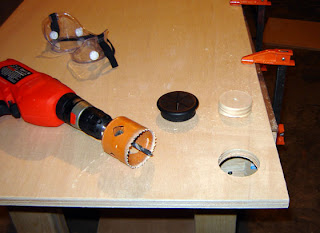
I did something I saw in a workbench book: I drilled little holes in the back for my lamps. That way I have one less thing to take up counter space.

The most important thing is that it fits! I can swoop my chair to any of the machines and they all feel like they are the right height!

Now that I've done the absolutely easiest thing in this room I'm going to try building drawers. If I can get them square I will be so happy.

Monday, February 18, 2008

Actual Progress!

Yep, I've done something. Quite a few somethings, actually.

I've ordered the techlighting, which should get here in about a month.

I sold my old computer desk Craigslist, and the lady picked it up on Sat. 15 minutes later I was marking a level line to make my sewing desk. DH came in asking what I was doing.
"Installing the brackets to hold up my desk."
"But you haven't built anything yet."
"Yeah, but I like ratchets."

I decided to buy heavy duty brackets so I wouldn't have to figure out the right size for my table. I used two for the short part of the L and 3 for the long part because plywood tends to warp over 36".

They feel very heavy because they are installed into the studs. I found a good trick for finding studs: Measure 16" from one side of an electrical box. Most are secured against a stud. Worked well for me.


I suppose I should talk about my choice of countertops. I decided that the laminate countertop was too expensive. I found some good pieces of countertop at my local Habitat for Humanity ReUse center, but they weren't the right size. So, I almost went with melamine, but then I looked at my bookshelves and remembered why I hate that so much. So, I decided to go the plywood and paint route. At least this way I can sand and repaint it easily if it gets scratched up.

Plus, with plywood I can "easily" cut holes for grommets. Ta Da!


I say "easily" because it does seem really easy, but you need to be patient. Buy a special drill bit that allows you to attach whatever size hole saw you need. Point and drill. What I didn't realize I would have to stop so often and clean out the cut, and clean off the gunk sticking to the saw. Once I realized that, no problems. The grommets I got from Rockler. The recommended hole size is a perfect fit.

So, that's what I got this weekend. Tonight I primed the back of the wood. It will be boring for a while, but I hope I will have the sewing desk done this weekend... then the hard stuff!
Monday, February 11, 2008

What's going on

I know I haven’t posted much, but I am still working on this… there’s just not much to show for it yet…

Here’s a big pile of plywood. Now I have to do a lot of cutting!


If nothing else, this has made me committed to do this thing... I've spent too much in wood to not. My next goal is to get rid of my current computer (sewing) desk so I can build my sewing table. That should be easy since I'm not building any storage into it.

I am also thinking about my lighting plan. At first I wasn’t going to change anything, just leave the one big fluorescent in the middle of the room. BUT, while I was playing around one day I realized how much shadow I would create while cutting or pressing.

I can do the “easy” thing and have an electrician install two can lights over each table, but my parent’s in law have this cool monorail lighting system that looks like it could be perfect. They went with Techlighting http://techlighting.com/default.asp?page=products&subpage=systemselect&sysid=1

Who wouldn't love a 5" bee light in her sewing room?


Okay, okay, I know a lot of people wouldn't, but I do!!

So, I’m trying to figure out how much light I need. Black says 2500 lumens. I want to use LED lights (yes, I know they’re really expensive, but they are much cooler and better for the environment). This would mean 13 bulbs, assuming a lumen rating of 200/bulb. I’m going to see if I can find a distributor and go see what they think!

Wednesday, January 23, 2008

Tops, tops, tops

I'm thinking about tops. The pressing table is easy: plywood, covered with wool and muslin/duck. But I'm worried about the other ones.

I hate melamine. Really, it annoys me to no end. In case you don't know, Melamine is what a lot of bookshelves are made of, the interiors of drawers, even lower quality office furniture. It's basically a white plasticy-paper glued onto some particle board. I don't like it because the top layer often ends up tearing off, the top is also easy to scratch, and the board often cracks (they even sell it a little larger than plywood b/c the edges are almost always messed up).

I did some research to see if there was a better quality melamine and here's what I found out:

  1. Melamine is the resin in the top layer, not the sheet of "wood product" itself.
  2. Laminate countertops often have melamine in them, just more, and thicker layers.
  3. In fact, laminate could be used for a lot of things: we laminate sheets of paper with plastic, melamine coated particle board is a laminate, as is laminate countertops. The difference is that the countertops are High-Pressure Laminate (HPL) as opposed to low-pressure. The best description I found is here: http://www.gopodular.com/support_articles/melamine_vs_real_laminate_arcade_enclosures.htm
So, I don't really want melamine. I would like something like laminate countertops, but I'm not sure if it's worth the extra expense.

I talked to a person at Home Depot last weekend, and to do my sewing table only, it would cost $170. While the top could also be made out of one sheet of nice plywood for about $40.

I think I'm leaning towards plywood and good finishing for the pressing table (it will be covered with a rotary cutting mat most of the time anyway) and still deciding about the sewing table.