Tuesday, May 27, 2008

Huzzah!

It still needs painting, but I feel like I've reached a major milestone... All construction is completed.

May I present to you....

the back
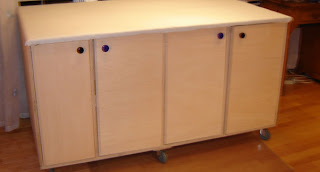
and the front
Sorry about the fuzziness of the pics. I'm not the best photographer anyway, and I'm shaking with excitement (and I'm only slightly kidding about that last part).

I was a little disappointed yesterday b/c none of the drawer fronts line up right, but dh reminded me that it's not a professional job ("and it looks it"). It is my first project with drawers and only my second project with doors, so I'm feeling okay.
All the knobs and handles come from the Habitat Restore center. They were pretty cheap, and I bought sillier knobs because of it. The back has black and blue knobs, the front these cool red jewel like ones.

This is probably more information than you need, but I chose to use pulls on the top with rounded edges because I hate the knob in my kitchen b/c they catch my zipper fly. Hence the three center drawers with pulls.

I did go to the restore center before I began building and thought about cobbling together a cabinet from old kitchen cabinets. It certainly would have been cheaper (probably not even counting the hours of work I've put into this thing), but then it wouldn't have been just what I wanted.

Such as....
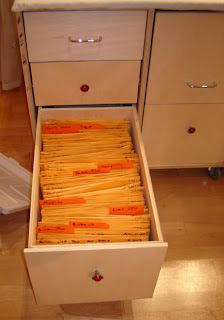

A file drawer to hold my patterns without squishing them. It's slightly wider than the normal so the 9x12 envelopes fit easily AND it's taller so I can have dividers sticking up, and my Jalie and Hot Patterns envelops fit in it as well.

Above that:
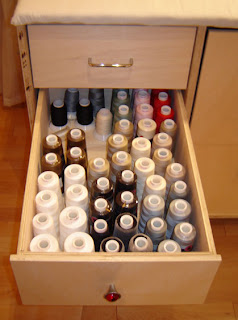
One drawer that holds all my cone thread!

And then:
Drawer for random accessories to my machines.

To the right... well, this was actually an accident, but I think it's ended up well. For some reason the top middle drawer did not want to fit. I think the sides of the cabinet ended up not being square. Dh suggested having a larger drawer front, and it works well.
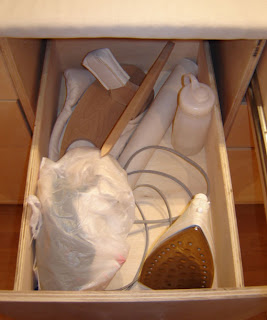
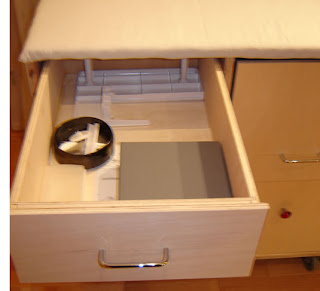
It holds my iron and my lesser used pressing aids (and iron cleaner)

Under that, more patterns (no it's not even half full).

Last column of drawers:
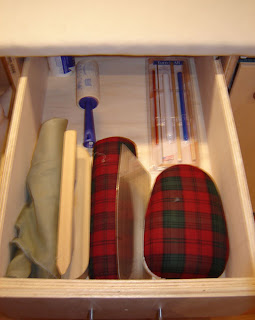
Most used pressing aids on top

AND THEN TWO EMPTY DRAWERS! Who knows what wonders will fill them!

The far right has a shelf for my notebooks with patterns in them. The bottom shelf was originally for those large Jalie and Hot Patterns patterns, but I don't need it any more.

And my favorite piece:
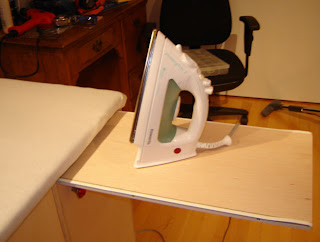
The landing zone. When the iron isn't being housed in the drawer (or on top, as I suspect it will be), I created a landing zone so I can have the table completely covered with fabric and still have a handy place to keep my iron.

I couldn't find a drawer pull for it at the restore center, or any hardware shop, or at any common online hardware store. But, while I was searching for a drawer pull at 11 pm on a Friday night (as you do) I found this site. The shipping cost twice as much as two pulls (a whole $8.40, but I don't care. They should be on their way to me soon!

Anywho, I've vacuumed the room (such a relief!) and will prime/paint it this weekend. Then I'm going to get back to sewing before I build my cutting table. I've got to think about what worked/what didn't this go round.

If you have any questions, let me know and I'll try to answer.

Monday, May 26, 2008

The week that was

Sigh, time to go back to work tomorrow...

I'm almost finished with the construction of the pressing table. I've got to get some screws, and then I'm be at the painting stage. Pics soon.

I was hoping that I would be done (painting and everything) by now, but alas, it's not to be. Had a good time off. Got to see some friends, do lots of "take care of Marcia" stuff. No sewing, but I got to work in the garden some, and made a tart! Yum!

It's the fresh fruit tart from Rose's Pie and Pastry Bible which I received from my inlaws last Christmas (along with Dream Sewing Spaces, so I'm clearly using the Christmas presents well!)

If only my hobbies weren't so expensive, I could keep myself busy for a long time! But alas, time to get ready to go back to work.

Saturday, May 24, 2008

Whoops!

Found my first real flaw in my plan today.

I engaged DH to help me put the wool onto the particle board. We wrapped it, stapled it, covered it in muslin, and then put it on top of the cabinet
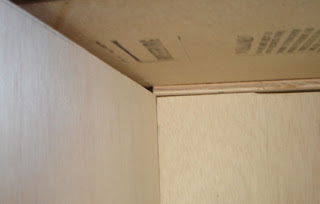
Don't know if you can tell, but the big gap in the middle is where the top no longer fits onto the bottom. The wool (army blanket, doubled over) adds 1/2" of height, which means that my wonderful dado-like objects no longer work.

So, here was the solution:

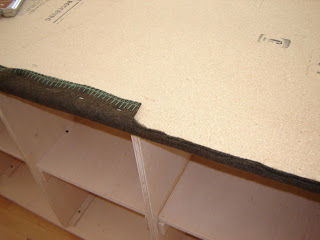
While the original staples were still on, I carefully went through and stapled into the edge of the board instead of the bottom. (The pic above shows the top turned over) Then, I removed the original staples (fun!) and cut off the extra padding, so the board fits on top just fine. I hope I put in enough staples to make it stable.

If I were doing this over, I would just put a simple 1/4" or 1/2" top on the cabinet and make the pressing board separate to sit on top.

Thursday, May 22, 2008

Perhaps not "Pimp"

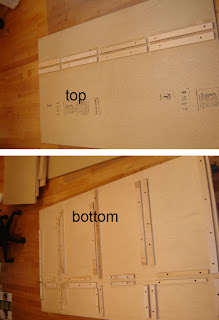
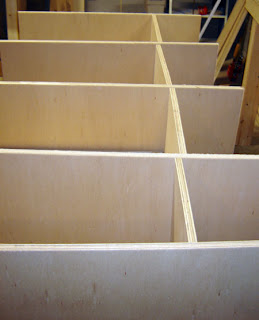
So I'm making actual progress! Very exciting! The pic below is of the top and bottom of the cabinet. Based on my father's idea, I made a "maze" where the vertical boards will come in contact. This has a couple of benefits... 1) It allows me to plan very carefully. 2) it provides plenty of support for the vertical boards. 3) It means I don't have to use dowels. I like dowels and all, but I have a hard time getting things to line up when I use them, no matter how carefully I work.

This maze functions like a dado but doesn't weaken the bottom board by cutting into it. The top is a similar idea but fewer pieces because it won't be under as much stress. The other nice thing about this joinery option is that it allows me to take the top off when I need to replace the muslin cover of the pressing board.

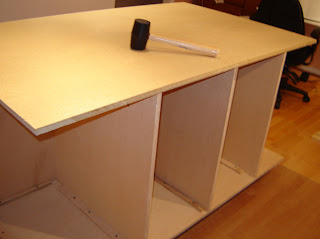
Here's the cabinet with the maze in place. Everything in this picture is staying on without any glue or screws. Just a good mallet whack where needed.

Here's my first four drawers installed. Now I just have to make 5 more! Ugh. The far right will be covered with a door and hold my pattern notebooks and large patterns that won't fit in the drawers (like Jalie)


Here's the back side, which will eventually be facing the windows. I'll cover all these with doors and it will be the "not so handy" storage.


Of course, there are drawbacks to my construction methods. 1) The maze is visible when you open the doors. Not very sexy, but quite functional... Maybe I should call this "foreman my sewing room" instead of Pimp.

I'm trying to decide if I should put an official drawer front on my drawers. They would look nice, but are purely aesthetic, and I can't decide if that's worth it to me. I like progress!!

Tuesday, May 20, 2008

This is the week!

So, I'm taking this week off from work. I just went to see a good friend in St. Louis. She's learning how to sew, and I forced helped her with a robe. It said easy to sew, but it had a cut on collar, which can be difficult the first time around. So, I strongly encourage that she get through at least attaching the undercollar to the neckline.

Now, I'm home. Spent today somewhat piddling with cooking/cleaning, but now I'm ready to dive head first into my sewing table!

Monday, May 12, 2008

Something old, something new

As I've been woodworking, I've been paying attention to how similar it is to my other, much-beloved hobby of sewing. At first, all I could see were similarities, but I'm starting to see differences as well.

Similarities:
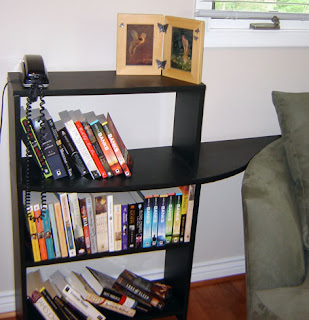
  • You can make something truly unique. I made my wedding dress, and it is by far the perfect dress for me. Likewise, I made this bookcase for the "cuddle chair" I bought for our bedroom. Part of the bookcase slips into the gap cause by the chair and is the perfect for holding a cup of coffee.
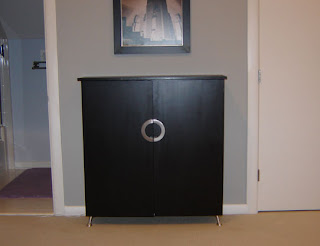
  • They are both great for an person with control issues like me. Too short and fat for store clothes to fit you? make 'em. Can't find a cabinet to fit in a room? make it. The cabinet below was the first thing I made (and in fact, the fact that I couldn't find what I wanted got me started on the whole woodworking thing) It fits perfectly in between our guest room closet and tiny bath.
  • Somethings don't exist for a reason. After you've sewn a while, you get to learn the "rules" like there's a reason high-stretch knit shirts don't have functional buttonholes. Woodworking is the same: remember that perfectly sized cabinet? Part of the reason we couldn't find one to buy was that the pre-made ones were all too deep. Part of the reason the plan was revised mid-process was because the doors were too heavy for such a thin cabinet to hold up. Whoops!
  • In general, mistakes can be salvaged. See above.
  • The 80/20 rule applies. In general, you can get 80% of the job done in 20% of the time. If you want it 100% perfect, you're going to be quadrupling the time you spend. There's nothing wrong with taking that time, but make sure it's worth it to you.
  • Both require DH's help. He's learned to mark with a chalk marker where I tell him to, or put a pin in. He also has to help me lift to the 8'x4' sheets of plywood. He doesn't like either, but he's good enough to help me with both.
  • Both are expensive hobbies. Sure, you can save money here and there with smart purchases and economical habits, but it's still an expenditure. I see many women who sew justifying their fabric purchases by comparing them to their husband's wood shop purchases. My poor dh just gets to watch me spend on both!
Differences:
  • Wood doesn't stretch. It can bend a little, but no compression. "Easing" doesn't happen. You cut it to size, period.
  • Woodworking is messy. Granted, sewing is messy too. But, after some time in the sewing room, a simple run over the floor with a broom and a run over myself with a lint picker-upper, and I'm good to go. After a day in the shop, a shower is required. It makes working on that much more of a "task." I have to be ready to commit.

Sunday, May 11, 2008

Proof of concept

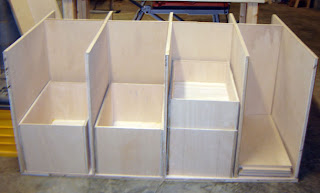
I actually made visible progress this weekend! DH helped me make all the long cuts on the big 4'x8' sheets of plywood. And here's what I got:

Now, nothing is actually put together except the drawers, but this is the idea. One long plank on the bottom, two sides, plus three dividers. The first three columns will have stacks of drawers. One large one on the bottom for patterns, and then two smaller ones on top for pressing aides, thread, and misc. The last column will have shelfs for large patterns (like Jalie) and my notebooks.

The drawers are 24" deep because that was the longest rails I could get reasonably. The back will be just shelving. Here's a side view:

To the left are the columns for the drawers, to the right will be what's against the window in my room. So, not the most easily accessible storage, but still present. And all this will be on casters, so I should be able to get to it without much trouble.

This weekend I'll be in St. Louis visiting a friend, and the next week is me time for working on my sewing room!

Tuesday, May 6, 2008

I have a blog thing!

So, I'm not to write a super-personal blog, but I don't mind a bit of sharing. Today Neefer, who writes Acorns to Oaktrees shared this, and it's about books, so I want to play along.

These are the top 106 books most often marked as “unread” by LibraryThing’s users.
Bold the ones you’ve read,
underline the ones you read for school,
italicize the ones you started but didn’t finish.
add a * beside the ones you liked and would (or did) read again or recommend. Even if you read them for school in the first place.

The Aeneid
The Amazing Adventures of Kavalier and Clay*
American Gods*
Anansi Boys*
Angela’s Ashes: A Memoir
Angels & Demons
Anna Karenina
Atlas Shrugged
Beloved*
The Blind Assassin
Brave New World
The Brothers Karamazov
The Canterbury Tales*
The Catcher in the Rye
Catch-22
A Clockwork Orange
Cloud Atlas
Collapse: how societies choose to fail or succeed
A Confederacy of Dunces
The Confusion
The Corrections
The Count of Monte Cristo
Crime and Punishment
Cryptonomicon
The Curious Incident of the Dog in the Night-Time
David Copperfield
Don Quixote
Dracula
Dubliners*
Dune
Eats, Shoots & Leaves*
Emma*
Foucault’s Pendulum
The Fountainhead
Frankenstein
Freakonomics: a rogue economist explores the hidden side of everything
The God of Small Things
The Grapes of Wrath
Gravity’s Rainbow
Great Expectations
Gulliver’s Travels
Guns, Germs, and Steel: the fates of human societies
A Heartbreaking Work of Staggering Genius
The Historian: a novel
The Hobbit
The Hunchback of Notre Dame
The Iliad
In Cold Blood: a true account of a multiple murder and its consequences
The Inferno*
Jane Eyre*
Jonathan Strange & Mr Norrell*
The Kite Runner
Les Misérables
Life of Pi: a novel
Lolita
Love in the Time of Cholera
Madame Bovary*
Mansfield Park*
Memoirs of a Geisha
Middlemarch
Middlesex
Mrs. Dalloway*
The Mists of Avalon
Moby Dick
The Name of the Rose
Neverwhere
1984
Northanger Abbey*
The Odyssey
Oliver Twist
The Once and Future King
One Hundred Years of Solitude*
On the Road
One Flew Over the Cuckoo’s Nest%
Oryx and Crake
A People’s History of the United States: 1492-present
Persuasion*
The Picture of Dorian Gray*
The Poisonwood Bible
A Portrait of the Artist as a Young Man
Pride and Prejudice*
The Prince
Quicksilver
Reading Lolita in Tehran
The Satanic Verses*
The Scarlet Letter*
Sense and Sensibility*
A Short History of Nearly Everything
The Silmarillion
Slaughterhouse-five
The Sound and the Fury
A Tale of Two Cities
Tess of the D’Urbervilles*
The Time Traveler’s Wife
To the Lighthouse*
Treasure Island
The Three Musketeers
Ulysses
The Unbearable Lightness of Being
Vanity Fair
War and Peace
Watership Down
Wuthering Heights*
Zen and the Art of Motorcycle Maintenance

Sunday, May 4, 2008

Bad Blogger


I know you all have been waiting with bated breath to see what comes next (kidding). Not much actually. It actually took me many weekends to even get back in the sewing room. I think I just needed a little vacation from all my hobbies.

I also had sinus crud and we went on a lovely mini-vacation, so I haven't been feeling well and/or around to do anything.

I have now sewn one shirt and made one more drawer.

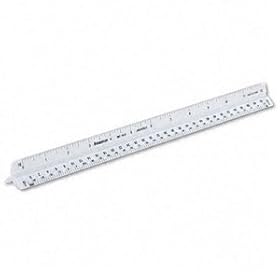
So, it will be boring stuff for a while, but I thought I would share my favorite new tool that I discovered when I started woodworking: The Architect's Scale


This nifty little ruler can be quite annoying if you don't know how to use it, but when you do, it can save a lot of time.

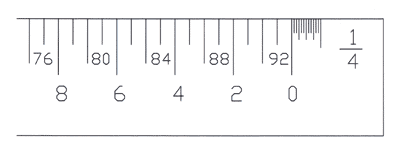
The most confusing part of the ruler is that it's really 11 scales in one. There are three sides, and each side has a bottom and top, and all but one of the top/bottoms has two scales on it. Here's a close up of just one bit:

The 1/4 tells you what scale that side is. Next, look for the zero. That's tells you which of the numbers lines you want to read. In the example above, we want to completely ignore the numbers 76-92. Those are coming from the other side of the ruler. Instead we're going to look at 0 - 8. It means we will have to read numbers right to left, but that's not too hard, and by flipping the ruler over we can get another scale.

The other idiosyncrasies of the ruler that make it annoying don't bother me once I understand why. For instance: why can't the zero just be on the end? That's to keep the marks on the end from getting messed up.

And what's with the marks to the right of the zero? Two reasons, as far as I see it. First, if the ruler was to have the divisions between the numbers it would become even more unreadable. Second, look closely, those dashes aren't breaking it up into 10ths (as metric rulers do) or 16ths (as imperial rulers do). Instead, it's twelve parts (as in 12 inches to a foot). So, you don't even have to convert the feet to inches or the inches to parts of a foot. Just add the number of divisions past the zero and you have your inches.

Anyway, I've found the scale really useful. I used the 3/32" scale when drawing out my room, 3/16" for the pieces of furniture and 1/8" when drawing smaller pieces (like the drawers) so I could see the joins clearly.

There are some longer tutorials online like this one (it's where I got the close up images from)